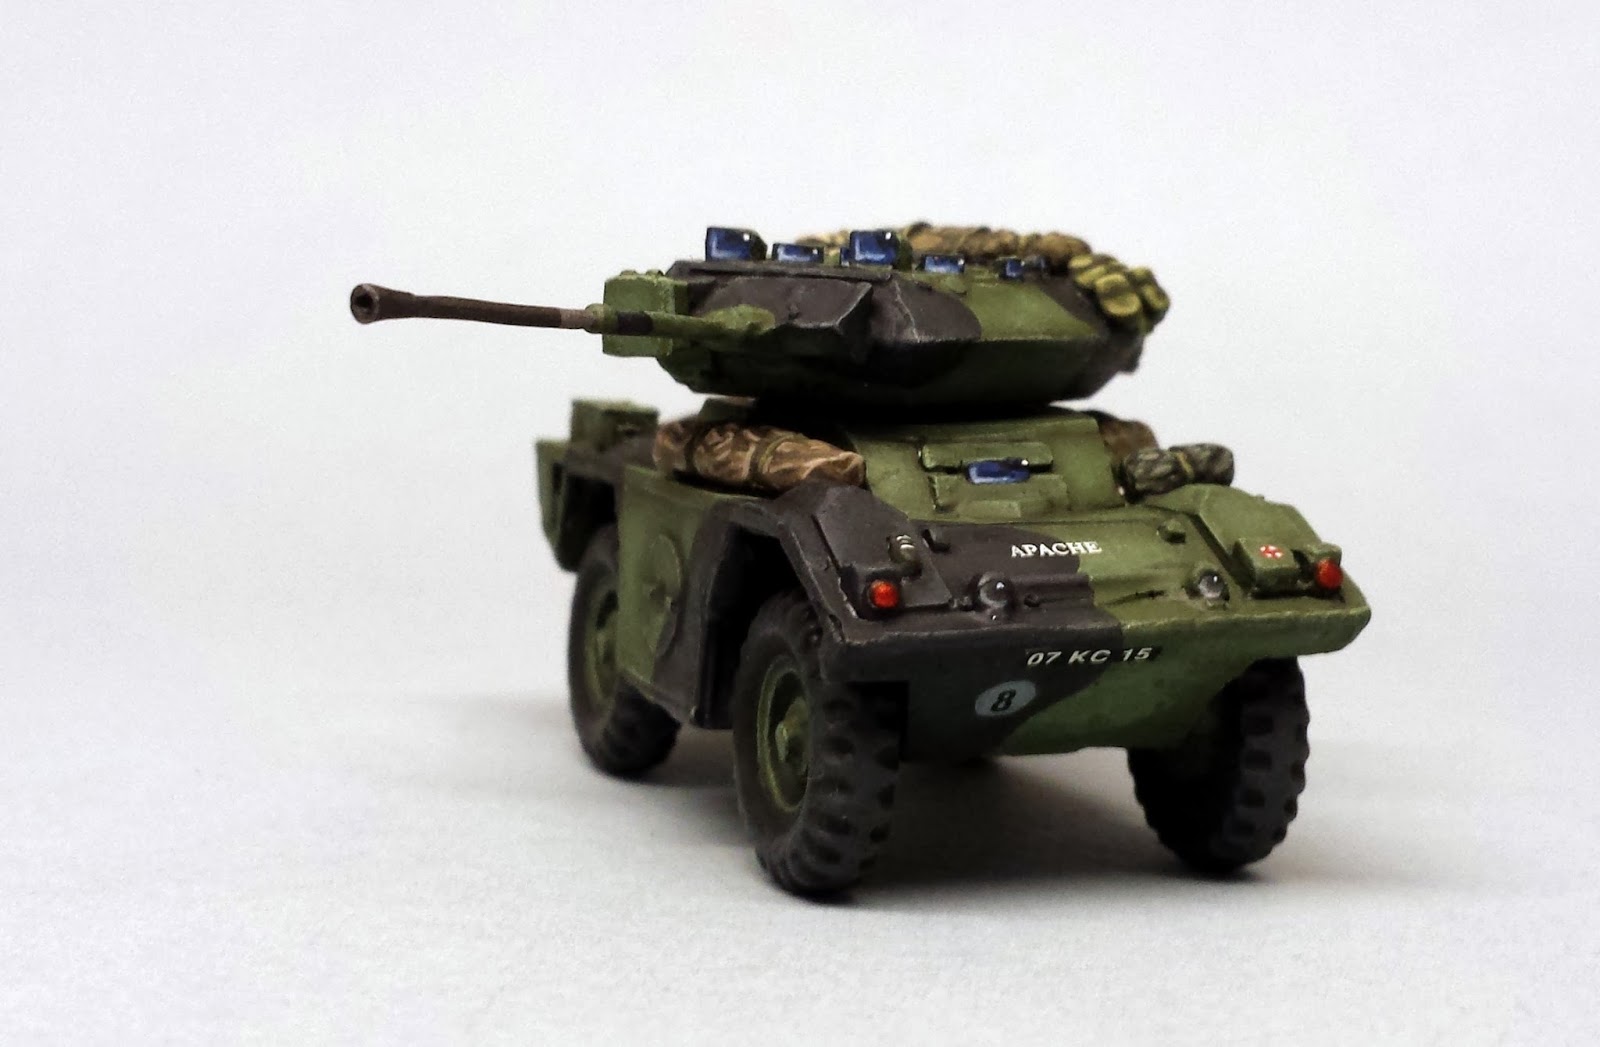
Or Alvis Saladin in the service of the Federal German Border Guards, if you prefer!
After the unmitigated disaster that was the Sheridan, I decided to
try and calm myself down by building something a bit more
straight-forward (and with a far simpler paint scheme...)
On
raiding the stash, my eyes lighted on a long-forgotten JB Models
Saladin armoured car. Bought yonks ago for about three quid, I'd
intended on doing a diorama feauring this, a Saracen APC, a Diamond-T
and a civvy motor having a Mexican stand-off at a T-junction somewhere
in Wales in the 50s... However, having accepted that that's never ever
going to get done, I decided it would make an ideal addition to the
1970s US force in the guise of a Sonderwagen 3 of the
BGS, and so I set about throwing it together.
The
JB kits (now Airfix) are very simple little kits (to the point of
crudity in the case of some of the earlier ones, such as this one!) but
with a little care and thought, they can be made into pretty convincing
little items. I the case of the Saladin, the most obvious omission are
the tie-downs surrounding the turret. I fabricated some out of stretched
sprue; they're horrendously over scale, but they give the impression
nicely. Next up, I drilled out the barrels of the smoke dischargers
(madness, but improves the look to no end) and the main armament, and
added a canvas sleeve to same. The co-ax .30 was replaced with an
S&S piece, and the AA .30 (which is just downright offensive) was
similarly skipped and replaced with a Sgts Mess item. Intending to leave
the hatched open, I duffed up some basic hatch interiors from stock and
more stretched sprue, and with the addition of some stowage from
various sources, I was left with this-
A
nice coat of what Humbrol had sold me claiming to bronze green soon
followed, (nothing like bronze green, but perfect for this scheme!), and
it was starting to come together...
Some
WWII panzer crewmen in field caps were sourced from Foundry
(conveniently also featuring winter parkas on some of the sculpts. Might
see about doing another one of these!) Some git came up with the great
idea of doing Sumpfmuster in 20mm...
Et
viola. One finished BGS Sonderwagen 3. Looks totally out of place in
it's bright green paint scheme against the snowbound base, but suitably
eye-catching on the table...! The registration plate came out far too
large, despite careful measuring. This will probably be replaced at some
point, but will be left in place for now.
Cheers
Iain
Showing posts with label Armour. Show all posts
Monday, 14 September 2015
Sunday, 13 September 2015
A Hazy Shade of Winter- 1970s US Army in Europe
Somewhat belatedly, I suppose I’d better post up
the pics of what I was working on at the time of the last post, i.e. Christmas….!
My BAOR and GSFG armies are set in the mid 80’s and in a standard, temperate, theme; this being the sort of “archetypal” appearance of both these forces. However, I’m usually on the lookout for doing something a bit different, and I always quite fancied doing an earlier US force, pre- Abrams and Bradley era.
So with this in mind I decided to start putting together a 1970s US army, since this would allow me to field the ever characterful M60, as well as all sorts of crazy shit like Sheridans, Kaiser Jeeps, Gama Goats and so on. As an added bonus, I would get to paint them in MERDC schemes, which I’ve always found really attractive and striking. There are 6 MERDC schemes, and I decided to go for a winter theme, since I’m a sucker for snowy armies, and of the two “snow” MERDC schemes, picked the less common, brown based, scheme for open terrain (It ain’t called the Fulda Gap for nothin’!)
At the moment, there is something of a dearth of suitable figures; I despise the “burly midget” look of many of the “classic” wargames figure producers, so prefer to stick with Elhiem if at all possible, and at the time of starting there were only two suitable packs available- a fireteam set of four GIs, and a slightly “Hollywood” set of Special Forces in parkas- though this latter set would suit my purpose admirably! As far as vehicles go, the situation is much better, and as always, a trawl through Kingkit always turns up some a) bargains and b) weird, esoteric shit that’s gonna look awesome in snowy MERDC! So without further ado I set to raising the troops
My BAOR and GSFG armies are set in the mid 80’s and in a standard, temperate, theme; this being the sort of “archetypal” appearance of both these forces. However, I’m usually on the lookout for doing something a bit different, and I always quite fancied doing an earlier US force, pre- Abrams and Bradley era.
So with this in mind I decided to start putting together a 1970s US army, since this would allow me to field the ever characterful M60, as well as all sorts of crazy shit like Sheridans, Kaiser Jeeps, Gama Goats and so on. As an added bonus, I would get to paint them in MERDC schemes, which I’ve always found really attractive and striking. There are 6 MERDC schemes, and I decided to go for a winter theme, since I’m a sucker for snowy armies, and of the two “snow” MERDC schemes, picked the less common, brown based, scheme for open terrain (It ain’t called the Fulda Gap for nothin’!)
At the moment, there is something of a dearth of suitable figures; I despise the “burly midget” look of many of the “classic” wargames figure producers, so prefer to stick with Elhiem if at all possible, and at the time of starting there were only two suitable packs available- a fireteam set of four GIs, and a slightly “Hollywood” set of Special Forces in parkas- though this latter set would suit my purpose admirably! As far as vehicles go, the situation is much better, and as always, a trawl through Kingkit always turns up some a) bargains and b) weird, esoteric shit that’s gonna look awesome in snowy MERDC! So without further ado I set to raising the troops
First to be tackled were the LRRPS, the Elhiem SF
pack with some ALICE packs added to confirm their SF status. I deliberately
went for quite a “blue” tinge for the
parkas, based on photos I’d seen, although didn’t quite mean them to go this
far, but I figure they look alright when all’s said and done…
Then it was onto the infantry. I made a few
modifications to the basic sculpts- I filed off the pockets on the trousers to
backdate them to the old OG-1-7s instead of BDUs, and added hoods to the
jackets to “winterise” them slightly. Then it was onto the fun part, painting!
I decided to do the helmets in the reversed autumn/winter side of the Mitchell
cover; I have no idea how accurate this is for the time period, but I have seen
it in photos of roughly this era, and thought it would match nicely the MERDC
scheme on the vehicles and the groundwork on the bases. Pretty successful if I
do say so myself…
Then it was onto the vehicles, and this is where
it all started to go horribly wrong. I started off with an S-Models Sheridan. I
can’t recommend this company’s products highly enough; crisp, clean mouldings,
good instructions, excellent fit of parts, PE and decals included, and best of
all you get two kits on each box! Winner! Anyway, this went together in jig
time, with some stowage added from the bits box, and the fragile, kit-supplied
.50 replaced with a metal one from Elhiem, and the commander’s hatch left open
to take a crew figure (yes, I realise for the time frame this should have the
cereal bowl armoured cupola; but in my fictional cold war the fighting’s been
raging for a while now, and replacements are being sent out from old, depot
stock in the US…)
Then it was onto painting. It all started well
enough, the MERDC was looking shweeet, and then I hit it with gloss varnish and
it all went to rat shit. Despite a successful trial run on an old kit, the acrylic
spray varnish had an argument with the Humbrol enamels used to do the
camouflage pattern, resulting in a crackled, rough texture on parts of the hull
and turret (bizarrely, the running gear survived intact…). It looks way worse
in the hand than what shows up in the pictures, so I ragequit the whole thing
and fired it onto the “to do” shelf until I could decide how I was going to fix
it.
And there it has lain ever since, sadly. However,
since we’re now into Autumn, I reckon I’ll break out the fine grade sandpaper
ad just smooth back the affected areas as best I can and re-touch them in situ,
rather than starting again from scratch, ready to restart come the winter…
Cheers
Cheers
Iain
Labels:
20mm,
Ambush Alley,
American,
Armour,
Cold War,
Elhiem,
Force on Force,
Infantry,
LRRPs,
Modern,
Recon,
S-Model,
Sheridan,
Special Forces,
tank,
US Army,
USA
Wednesday, 24 December 2014
Mobility!
In another addition to Team Trotsky, I’ve finally managed to get some mobility into the force, with the addition of an S-Model BRDM-2, supplied by The Hobby Den. This is a delightful little model, of the “Quick build” variety, and even better, each box contains two, for about twelve quid! The level of detail on these kits is excellent, and the box even includes a fret of photo-etched brass parts in addition to a decent decal sheet, providing options for Russian (including Guards, Naval Infantry and a somewhat generic red star with a hammer and sickle within- which I’ll probably use on a KGB BTR-70, since I have no idea what they’re actually intended for…) Czech, Polish and Romanian vehicles.
I ended up leaving off the bulk of the etched brass parts, using only the towing hooks; the rear view mirror and headlight brush guards I wrote off as two fragile for gaming purposes, I tried to attach the small guard above the commanders hatch, but this too proved to be too fragile, and so was replaced with a piece of bent sprue, likewise I substituted the grab handles on the engine deck and hull sides with strips of stretched sprue, to give an impression of the detail, rather than leave these quite obvious details off completely.
Given the fact that this is a “Quick build” (and thus much vaunted by wargamers) kit, I would’ve liked to see the inclusion of alternative plastic parts for these footery brass bits; for although they would have undoubtedly been clunkier, they would have been more robust and easier to attach, and in a gamin piece this would’ve been a good trade off. Likewise, I would happily have seen the PE parts deleted in preference for some better consideration of some of the moulding gates in some of the plastic parts- things like the machine guns and entrenching tool have really quite thick gates feeding into their very slender and delicate barrels and hafts. I ended up mangling the spade and replacing the co-ax MG with more stretched sprue.
The kit was finished off with some minimal stowage from Kingfisher and BW, and sat on an MDF base from Warbases.
Painting and decals followed, and while in reality, the Guards insignia would’ve
been painted out if action was imminent, the S-Model decal omits the white
infill, and looks quite “low-vis”, so I decided to keep it on, to break up what
would otherwise have been an ugly green blob. A nylon brush bristle provided
the radio aerial, and it was topped off with my signature Disney-fied
groundwork….
This will soon be joined by the AT version, as
well as some assorted APCs, and the whole horde will be, more or less, mobile come the new year!
On that note, it only remains for me wish you all a Merry Christmas, and thanks you for your interest in the blog over the last year, hoping this finds you well, and all the very best for 2015!
Cheers,
Iain
Monday, 3 March 2014
Fox Nearing Completion
Progressing at my usual glacial speed with the Fox, however, it is now slowly getting there!
Optics finished, decals sourced and applied, and then glossed, awaiting an overall coat of matt.
Things then went slightly awry with the matt varnish, with a load of frosting appearing in the recesses; however, after an initial burst of cursing, swearing and general anger management issues, I did discover that scraping away the worst of the build up with a dental picker and then a liberal scrub with white spirit seemed to solve the more minor bits. The remaining large areas will just get a repaint and a much thinner (think drybrush) coat of varnish. Thankfully, these are confined to some of the tyre treads, under the wheelarches and in the jerry can stowage, so shouldn't take long to sort out...
All that remains after that will be to summon up the enthusiasm to get a base done...
Cheers
Iain
Optics finished, decals sourced and applied, and then glossed, awaiting an overall coat of matt.
Things then went slightly awry with the matt varnish, with a load of frosting appearing in the recesses; however, after an initial burst of cursing, swearing and general anger management issues, I did discover that scraping away the worst of the build up with a dental picker and then a liberal scrub with white spirit seemed to solve the more minor bits. The remaining large areas will just get a repaint and a much thinner (think drybrush) coat of varnish. Thankfully, these are confined to some of the tyre treads, under the wheelarches and in the jerry can stowage, so shouldn't take long to sort out...
All that remains after that will be to summon up the enthusiasm to get a base done...
Cheers
Iain
Labels:
20mm,
Ambush Alley,
Armour,
Armoured Car,
BAOR,
British,
Cold War,
CVR(W) Fox,
Force on Force,
IRONSIDE,
Recce,
Recconaissance,
S&S Models,
WIP
Subscribe to:
Posts (Atom)